All about autofill in Microsoft Excel

 Sep 22, 2014

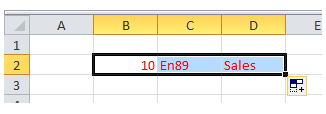
You all agree that Microsoft Excel’s Autofill feature is one of the most popular and versatile features in Excel, however not a lot of people know about its full potential, so let’s explore this feature today. If the content of a cell is a formula, Autofill, by default, copies the formula to other cells taking care of cell increments automatically. If the content is a value, it simply copies it to other cells. This is the default behaviour, but it doesn’t stop there. Every time you use Autofill, a little icon appears where you release the mouse, and if you click on this icon you will get further options, which we will shortly discuss. Please follow these steps to discover some of the features. In your Excel worksheet, type the number “10” in cell B2 and then format the cell with red font. In cell C2, type “EN89” and in cell D2, type “Sales.”
All about autofill in Microsoft Excel

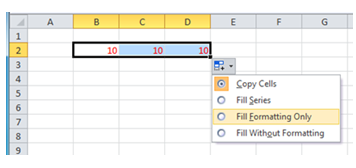
Autofill cell B2 across to cell D2 and after you released the mouse, click on the icon that appears. Select Fill Formatting Only.

All about autofill in Microsoft Excel

See how only the formatting, in this case, the red font, is copied instead of the value.

All about autofill in Microsoft Excel

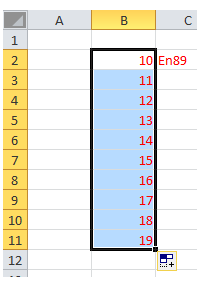
Autofill cell B2 down 10 rows and click on the appearing icon. Select Fill Series. You can see that the numbers will be filled sequentially and the formatting is also copied.

All about autofill in Microsoft Excel

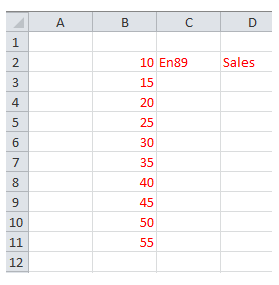
What if you wanted the numbers to fill in multiples of 5 rather than 1? In this situation, you could autofill while holding the right click of your mouse rather than left click. A menu will pop up and you will need to select “Series…”. Type 5 in the Step Value box and click OK.

All about autofill in Microsoft Excel

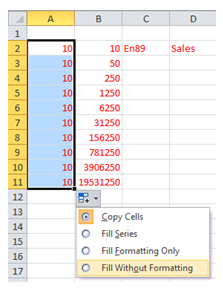
You should see correct result i.e. a sequence of linear series with increments of 5. You could repeat this process again but this time select [Growth] in the pop up box. This produces a geometric series of ratio 5. For the next exercise, in cell A2, type the number “10” and format it with red font again. Autofill it down 10 rows and click on the appearing icon. Select Fill Without Formatting. You can see that in this case, the number will be copied without formatting.

All about autofill in Microsoft Excel

In cell B3, type in number “20.” Now select B2 and B3 together and autofill down to A11. What you will see is the linear series of an increment of 10. Excel has calculated the difference between the first 2 cells you selected and has applied this increment to the rest of the series. It’s also possible to autofill months of the year and days of the week. For example, in cell F2, type in “Jan” and autofill it down to F11. Now you’ll see a sequence of the months in the 3-letter format – Jan, Feb, Mar etc. In cell G2, if you type “January” and autofill it down to G11, you’ll see the months sequence in full – January, February, March etc. You can do the exact same thing with days of the week. If you were to type “Jan” in cell F2 and “Apr” in cell F3 then select both F2 and F3 and autofill down to F11, Excel will calculate the difference between the two months which is 3 and has continued this pattern for the rest of the series. There we have it. Although there are some other options available in the popup menu and icon, they are self descriptive and I’m sure you can explore them easily now. Happy autofilling!

How do your Excel skills stack up?   

Test Now  

About the Author:

Cyrus Mohseni  

Having worked within the education and training industry for over 15 years as well as the IT industry for 10 years, Cyrus brings to New Horizons a wealth of experience and skill. Throughout his career he has been involved in the development and facilitation of numerous training programs aimed at providing individuals with the skills they require to achieve formal qualification status. Cyrus is a uniquely capable trainer who possesses the ability to connect with students at all levels of skill and experience.

Read full bio
top