

May 19, 2014
Slicers were first introduced in Excel 2010 and gave us a nice easy way of filtering PivotTable data. Instead of the typical drop-down list filtering in Excel, slicers have a set of buttons to enable quick filtering. It provides labels and details so that the user can easily comprehend how the data is appearing. In Excel 2013, we can now create slicers to filter table data. Slicers are useful because they clearly show what data is visible in the table after it has been filtered. In this post, I'll go through the steps in order to create slicers and filter your data in Excel 2013. Step 1: If necessary, convert your data range to a table. To do this, click anywhere in the data range. Go to the 'Insert' tab in the Ribbon and click the 'Table' command. Step 2: A new tab called 'Table Tools Design' will appear in the Ribbon as seen in the image below. Step 3: Click on the design tab and then select 'Insert Slicer' in the Tools group.
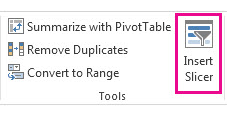
Step 4: The 'Insert Slicers' dialog box will open. Tick the boxes you want to create slicers for and then press OK. A slicer will appear for each header you checked.
Step 5: Another new tab called 'Slicer Design' will also now be visible and this can be used to format your slicers (e.g. change the colours, sizes etc.)
Step 6: To filter the data, click on the values in each slicer that you want to show in your table. To select multiple values hold down the Ctrl key on your keyboard when selecting.
Step 7: To clear the filter, click on the 'Clear Filter' button at the top right of the slicer.
How do your Excel skills stack up?
Test NowRelated Articles


About the Author:
Nicky Bull

Nicky started her professional life over 19 years ago in the IT industry. Through the initial years of her career, she worked in the areas of software development & project management for some of the leading organisations in South Africa and U.K. Over the past 6 years, Nicky has been working as a Desktop Applications trainer, delivering courses to both corporate as well as government organisations across the entire Microsoft Office suite. Her approach to training delivery is very pragmatic and she finds immense fulfilment in her ability to assist other people with their growth and development.
Read full bio


Next up:
- Hyper-V – Enhanced
- On being a Professional Development trainer
- Help! I typed in the wrong dimensions for my InDesign document!
- How to set up a Windows 7 and 8 HomeGroup
- VBA Excel: Finding the last row of a worksheet (Part 2)
- Mobilising SharePoint 2013
- Becoming a great workplace trainer starts with three words (Part 2)
- 3 programming tips in Visual Basic
- Implementing security in SQL Server 2014
- Borders and shading in Microsoft Word 2010
Previously
- Implementing Big Data Solutions in SQL Server 2014
- VBA Excel: Finding the last row of a worksheet (Part 1)
- EAs and PAs: Asking your boss the right questions
- How to create fillable forms in Microsoft Word
- The Exchange Admin Center (EAC) of Exchange 2013 - It's new!
- Becoming a great workplace trainer starts with three words (Part 1)
- Response Groups in Lync Server 2013
- Calculate the Resources Standard Rate in Microsoft Project
- An introduction to cloud computing
- Turn the heat up on your text in Photoshop
