

Jul 10, 2014
It’s common to store Word documents in a SharePoint library. If that library has "versioning" turned on, then you may want to display the version number (or other SharePoint metadata columns) in the header or footer of the Word document.
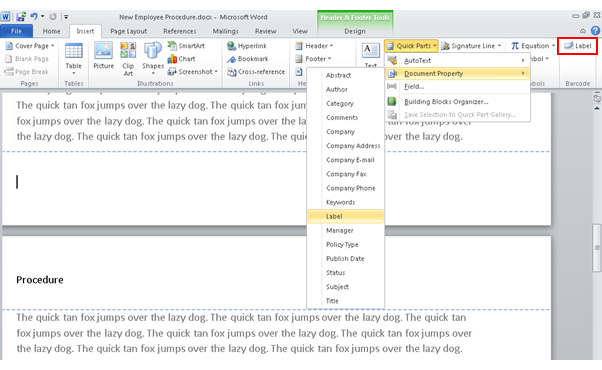
If you create your own columns in the SharePoint library then it is easy to insert that column into the Word document. All you have to do is go to the 'Insert' tab in your Word document, click the 'Quick Parts' button on the far right and select 'Document Property.' The SharePoint column that you created will now be listed as an option here.
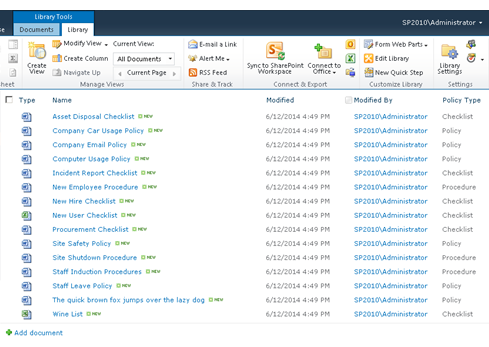
Take a look at the example below. In SharePoint, I have created a library and put some files into it. I have also created a metadata column called ‘Policy Type’ and filled it in for each file.
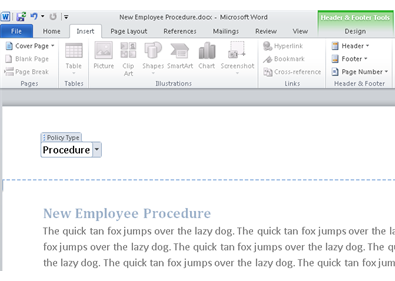
When I open one of these Word documents, I can insert the ‘Policy Type’ column into the Word file (through the 'Document Property' as advised above) so it can be displayed and printed as part of the document. Here is the result:
However, if you haven't already noticed, there isn’t an option to choose columns that the SharePoint Library comes with, such as the SharePoint ‘Version’ column. In this next section, I'll explain how to insert the 'Version' column.
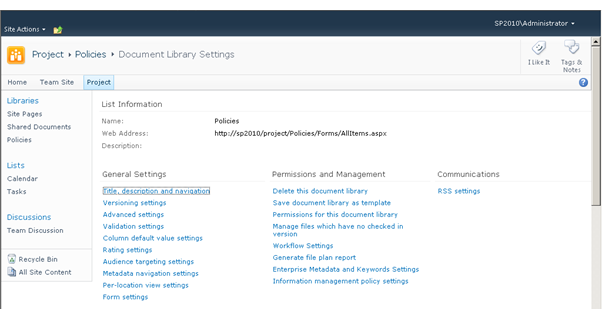
SharePoint Libraries have a feature called 'Information Management Policies' and one of the things this can do is to insert a label. We are going to create an Information Management Policy with a label that is equal to the Version column and insert that. To do this, go to your 'Document Library Settings' and under the ''Permissions and Management' list, click on 'Information Management Policy Settings.'
Then in the next screen, click on 'Document' (or the main content type you are using in the Library) and you will end up in the policy area. Scroll down to the bottom of the page and click the tick box for Labels.
In the box that says 'Label Format,' type this:
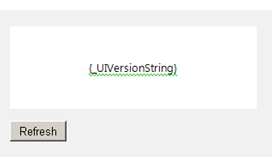
{Version}
If you click on the 'Refresh' button, you'll be able to see what the label looks like & it should look like the below. This is good because it means SharePoint is recognising our code.
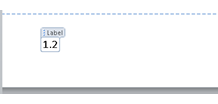
Now we can open a Word document and insert the 'Version' number. Notice in the image below that this time, I am inserting the label in the footer. Repeat the steps from before and navigate to the 'Document Property' list and select 'Label.' The label is now inserted as a field into the document (basically, an update-able piece of text).
How do your Excel skills stack up?
Test NowRelated Articles


About the Author:
Matthew Goodall

Matthew is a qualified Microsoft Office Specialist, Microsoft Certified Applications Specialist and a Microsoft Certified Trainer with over 11 years of hands-on experience in a training facilitation role. He is one of New Horizons most dynamic instructors who consistently receives high feedback scores from students. Matt enjoys helping students achieve real professional and personal growth through the courses he delivers. He is best known for creating “fans” of students, who regularly request him as an instructor for any future courses they undertake at New Horizons.
Read full bio


Next up:
- Use SCCM 2012 R2 to manage Linux machines
- Easily convert dates to Australian format in Excel
- Cross-site publishing with SharePoint 2013
- Becoming a great workplace trainer starts with three words (Part 3)
- Remove blank rows in Excel with this VBA code
- 10 essential keyboard shortcuts in Photoshop
- Networking architecture in Lync Server 2013
- Access your Access files in Microsoft Project
- Interviewing and avoiding the artful dodger!
- Crash course in Microsoft Azure SQL Database
Previously
- Ace your next presentation with lessons from these tennis pros
- The “New” Exchange 2013 Edge Transport Server
- 3 settings that will increase your efficiency in Microsoft Project
- 4 steps to establish a SQL Server connection
- Combine MATCH and INDEX in Excel for a powerful tool
- A truly botched presentation…but Samsung are happy!
- Monitoring communication sessions in Lync Server 2013
- How to populate tables in Excel VBA
- Protecting content in Microsoft Word with 'Restrict Editing'
- Data Quality in SQL Server 2014 for dummies (Part 2)
