

Dec 06, 2016
Despite the fact that many developers consider Flash CC (or now Animate CC) no longer the developer platform since the introduction of HTML5, Java and CSS3 that produce rich media content as that of Flash (as an animation application or in films), it has as much relevance today as it did before. In fact, many of the Sunday cartoon shows you can watch were produced by Flash, some of which were produced by major studios like Nickelodeon.
In Part 2 of my Animating with Adobe CC series we will look at importing the character design from Illustrator into Flash CS6/CC or Animate-CC that will allow us to convert imported assets as symbols so we can animate in the application.
You will find that, while the layout of panels throughout the application’s environment and across the mentioned versions may vary slightly, the fundamentals to the same application remains the same as you will find the Timeline, the Stage in the middle and the Library.
In part 1 of the series we looked at using Illustrator and the Path approach to create our character designs. While both Flash/Animate CC and Illustrator produce vector graphics, I prefer the controlled method found in Illustrator to create illustrations rather than the fluid approach found in Flash.
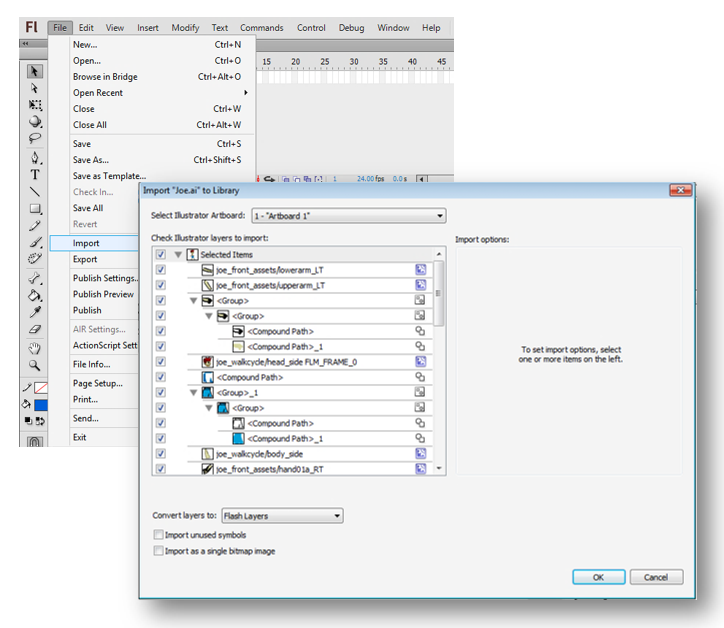
To import the Illustrator file, go to the File Tab, select Import, and thenImport to Library. In the Import to Library window you will see a list of all the graphic elements that forms the illustration and of the ones checked they will be the elements imported to Flash. Below the list ensure that Flash Layers is selected and since we want to manipulate the elements for animation in Flash we will not check the Import as bitmap image.
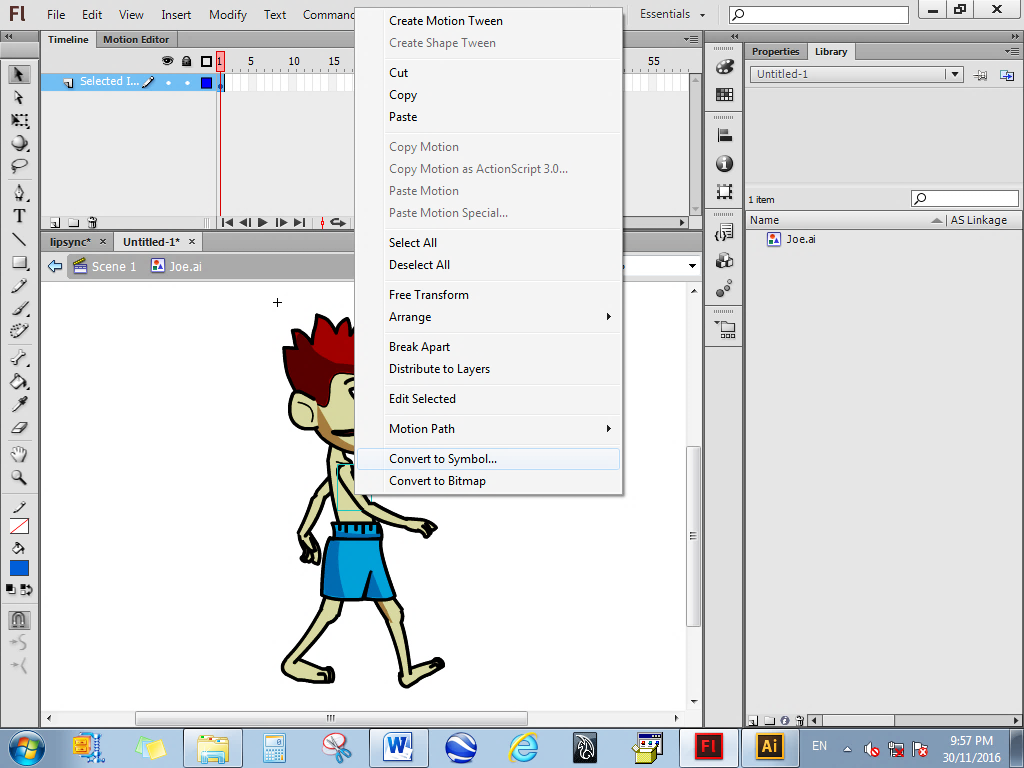
You have now imported the artwork into Flash as a Graphic Symbol as indicated in the Library panel on the left. However, the arms, legs, body are all in the one Graphic Symbol and in order to manipulate each part to create a walk cycle, we must convert each animated part into a symbol.
Right-click the upper arm and from the drop-down menu select Convert to Symbol.
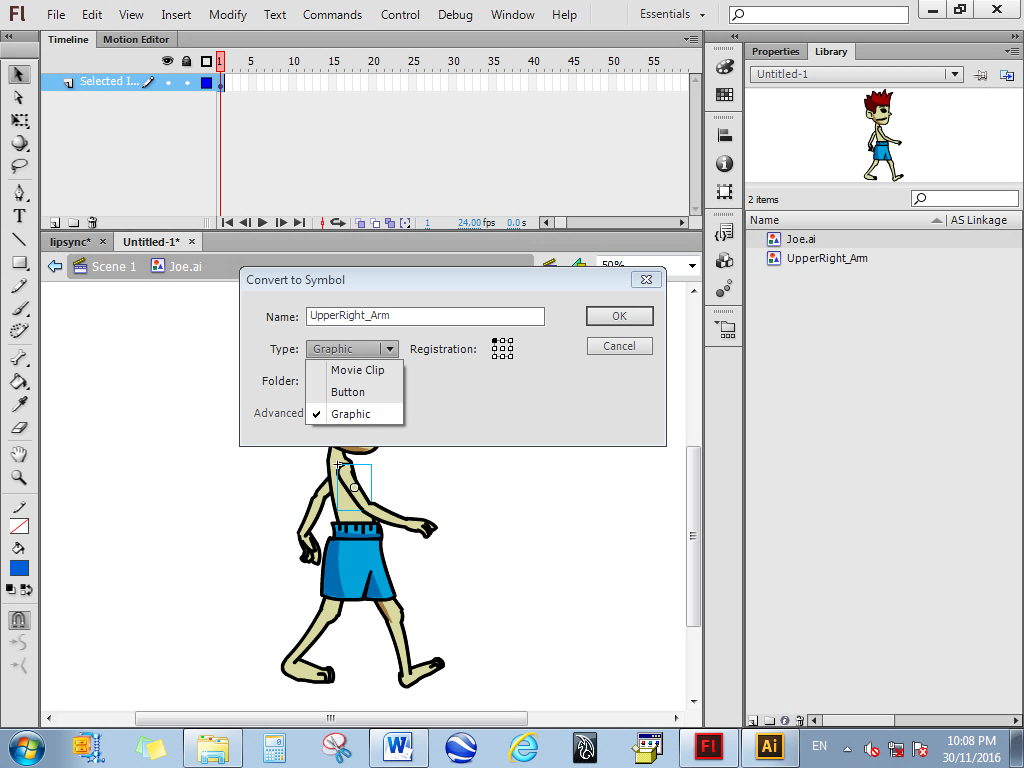
In the Convert to Symbol window provide the Symbol name UpperRight_Arm and change the Type to Graphic, then select OK. We now have the UpperRight_Arm as a separate symbol now found in the Library. Repeat the steps for each animated part and with a library of symbols we will explore creating a walk cycle in our next blog for this series.
For more information, take a look at New Horizons' suite of Graphic Design courses.
How do your Excel skills stack up?
Test NowRelated Articles


About the Author:
Keith Ching

At New Horizons Keith delivers Microsoft Office, Sharepoint and Adobe/ Graphic Design training to corporate Australians. Because of his proven ability to build rapport with Clients, Keith has been engaged on training projects that have required expertise outside of the traditional instructing role.Keith also enjoys sharing his knowledge with others, in particular in educating students who contribute to our local ICT industry and economy. In doing so Keith has delivered high quality training to over 4000 students at an average of 92%.In a competitive industry which constantly changes, Keith has a unique skill set which is up-to-date with the latest technology combined with being able to communicate this technical knowledge in a way that students relate to in an engaging, clear and concise manner.His passion in IT and Art and Design has resulted in several recognised qualifications which are a reflection of his creditability by peers and industry.
Read full bio


Next up:
- Are you MAD?
- Talking about Men's mental health
- What you didn't know you could do in Skype for Business
- Configuring user profiles in SharePoint 2016
- How-to: Redirect to a different page after adding new list items in SharePoint
- Sharing a Word Document on OneDrive
- Why focus on company culture?
- Understanding layers in Photoshop
- A focus on value
- Elton got it right
Previously
- Creating a shared service in Angular 2
- How to avoid the five major concerns of performance appraisals
- How-to: Screen recording in PowerPoint
- Feel safe with Advanced Security Management for Office 365
- Java: Extend or Implement? This is the question.
- Pessimist or Realistic Optimist?
- Microsoft Planner: Work together effortlessly
- Software defined networking in Windows Server 2016
- How to: Create a company style guide
- Using Code First Migrations in Entity Framework
